Using Office 365 with SyncSign
Prepare your Office 365 calendar (Enterprise edition or with a commercial license) for use.
Before pairing SyncSign with your Office 365 calendar, you must ensure that your calendar supports SyncSign’s functionality by following three simple steps:
First, ensure that you have the appropriate permissions to manage and set the current calendar
Modify the Settings of the New Room Resource
After creating a new room resource, you will need to edit some of its properties to enable SyncSign to display your meetings correctly.
The default setting in Office 365 is to display the organizer’s name rather than the actual event title of the scheduled event. To fix this issue, run Windows PowerShell as an administrator and follow these steps:
Connect to Exchange Online PowerShell with Multi-Factor Authentication
If you want to connect to Exchange Online PowerShell with Multi-Factor Authentication (MFA), you cannot use the instructions in Connect to Exchange Online PowerShell. MFA requires you to install the Exchange Online Remote PowerShell module and connect using the Connect-EXOPSSession cmdlet.
For more information on how to connect to Online PowerShell with MFA, click the link。
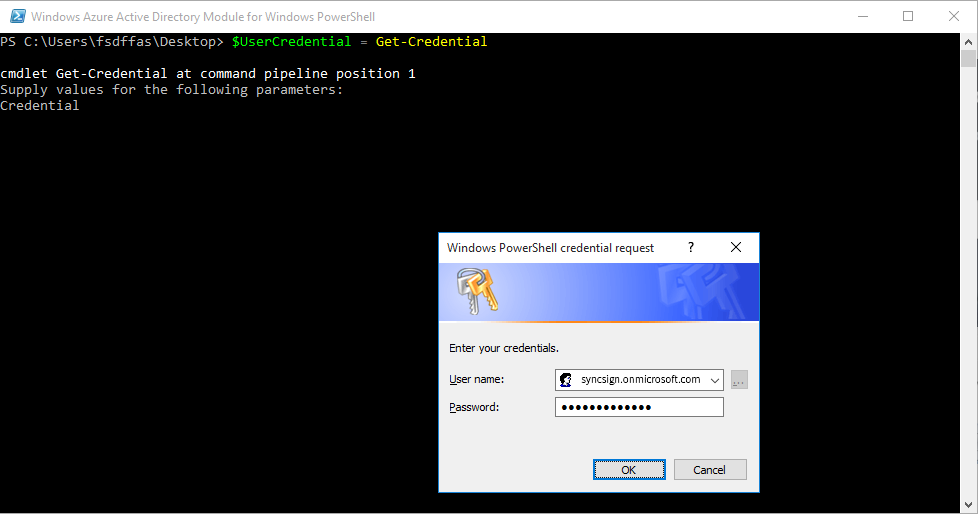
Enter the following command:
$UserCredential = Get-Credential
A dialog box should appear asking for your credentials. Enter your Office 365 login information.
After that, run the following command:
Session = New-PSSession -ConfigurationName Microsoft.Exchange -ConnectionUri https://outlook.office365.com/powershell-liveid/ -Credential $UserCredential -Authentication Basic -AllowRedirection
Enter:
Import-PSSession $Session
If an error message appears (shown in the red text as displayed in the image below), run the following command:
Set-ExecutionPolicy RemoteSigned
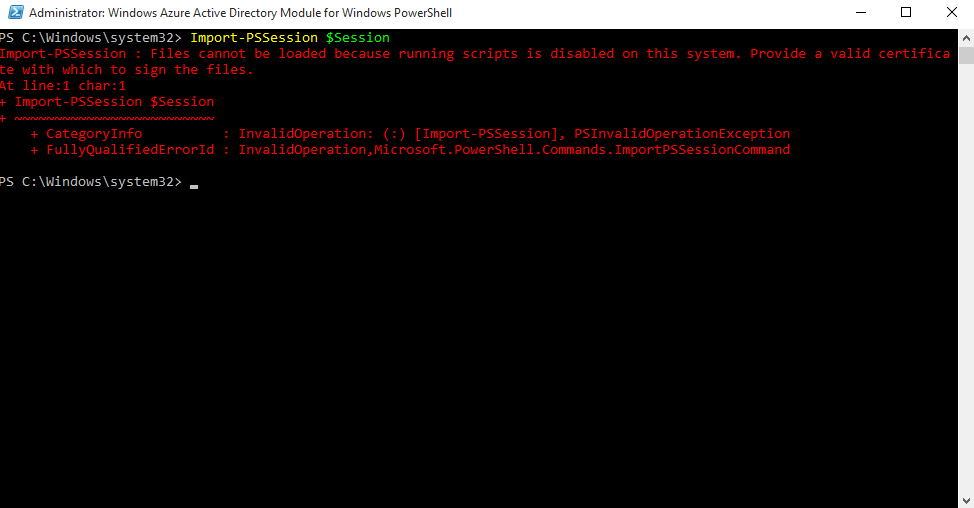
When prompted, type “Y” and press Enter. Then run:
Import-PSSession $Session
Enter the last command: (“Skip to this step if you did not receive an error message as shown in the image above”)
Get-MailBox –Identity <roomresource@email> | Set-CalendarProcessing -AddOrganizerToSubject $false -DeleteSubject $false -DeleteComments $false
This will allow SyncSign to correctly retrieve the meeting title and description of each room resource and display the correct name of all events scheduled on the room calendar.
Note that roomresource@email represents the email of your room.
Additionally:
To hide private meetings, run the following command:
Get-MailBox –Identity <roomresource@email> | Set-CalendarProcessing -AddOrganizerToSubject $false -DeleteSubject $false -DeleteComments $false
Note that roomresource@email represents the email of your room, and only new meetings will reflect the changes.
After preparing your Office 365 calendar for use with SyncSign, log in to the SyncSign portal and pair SyncSign with your calendar.
In the step of choosing the binding data source “Calendar,” select Office 365. Choose to log in with delegate user or as a global administrator permissions (Not recommended) . Learn more about these two different permissions at this step.