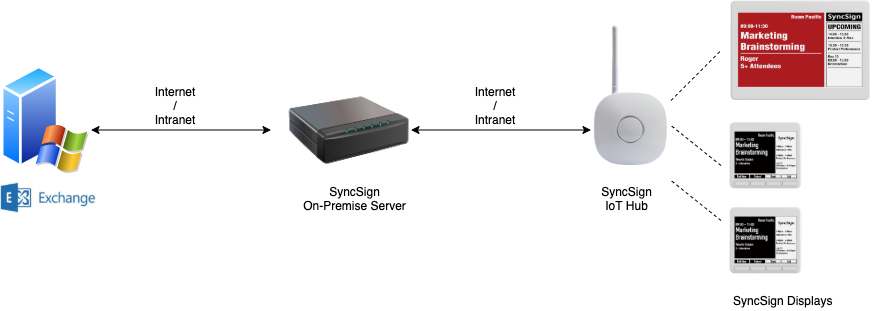
Using Exchange Server
Introduction
The Microsoft Exchange Server (Outlook) integration is only available in SyncSign On-Premise Server (SOPS) Setup (SOPS).
Watch this video for a walkthrough on how to setup the Microsoft Exchange Server.
Create the room resources
You can skip this step if you have created the room resouces berfore.
There are two ways to create a room calendar:
Shell Method
Console Method
Creating room via the shell
New-Mailbox -Name 'Meeting Room' -Alias 'meeting_room' -UserPrincipalName 'meeting_room@YOUR_DOMAIN_NAME.COM' -SamAccountName 'meeting_room' -FirstName 'Meeting' -Initials '' -LastName 'Room' -Room

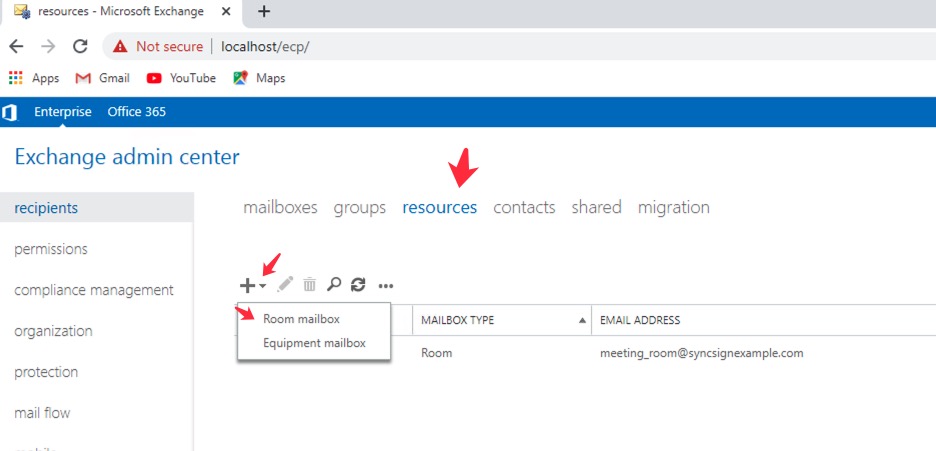
Creating room via Exchange console
Go to
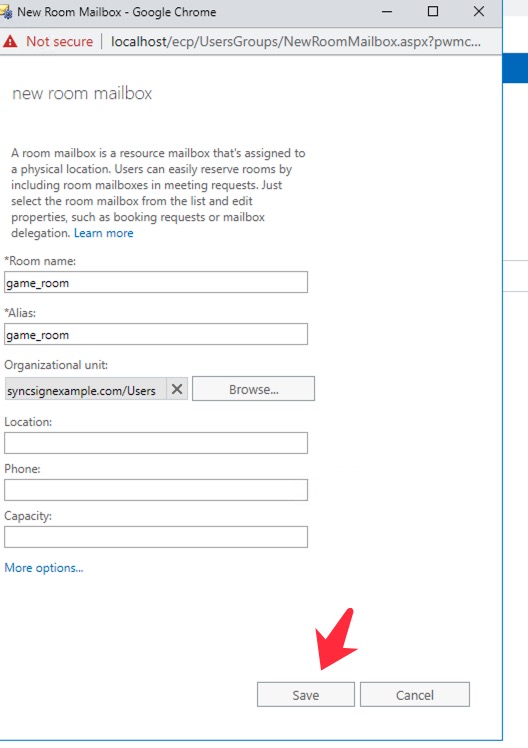
http://<Your-Exchange-Server-Domain>/ecp. Sign in Exchange Management Console (EMC) using the Administrator credentials.Navigate to Recipient Configuration > Resources > New Room Mailbox
Input the information and save settings
Add room to room list
You must add a room to a room list before SyncSign can retrieve this room
Create the room list
New-DistributionGroup -Name "SyncSign Rooms" -RoomList
Add room to the room list:
Add-DistributionGroupMember -Identity "SyncSign Rooms" -Member meeting_room@YOUR_DOMAIN_NAME.com
Configure each room
Once you have room resources established for your rooms, you’ll want to configure them to include important details like title, description, privacy settings, prevent conflicts, etc. The following configuration ensures this information is passed through to SyncSign.
All rooms via shell
Open Exchange management shell. Run the command:
Get-Mailbox -RecipientTypeDetails RoomMailbox |Set-CalendarProcessing -AddOrganizerToSubject $false -DeleteSubject $false -DeleteComments $false -RemovePrivateProperty $false -DeleteAttachments $false -AutomateProcessing AutoAccept
Single room via shell
Open Exchange management shell. Run the command:
Set-CalendarProcessing -Identity "meeting_room” -AddOrganizerToSubject $false -DeleteSubject $false -DeleteComments $false -RemovePrivateProperty $false -DeleteAttachments $false -AutomateProcessing AutoAccept
Set-CalendarProcessing -Identity "game_room” -AddOrganizerToSubject $false -DeleteSubject $false -DeleteComments $false -RemovePrivateProperty $false -DeleteAttachments $false -AutomateProcessing AutoAccept
Create a Service Account
The first step is to create a service account to authorize SyncSign to access the shared resource calendars for your office from the Exchange Server.
Note
A service account is a user account with a specific purpose: to provide a security context for services - such as your calendars - which run on a Exchange Server. Administrators can manage service accounts individually to determine the level of access outside applications will receive.
There are two ways to create a service account and mailbox:
Shell Method
Console Method
Creating a service account via the shell
In the Exchange management shell, run the command:
New-Mailbox -UserPrincipalName syncsign@YOUR_DOMAIN_NAME.com -Alias syncsign -Name SyncSign -OrganizationalUnit Users -FirstName SyncSign -LastName User -DisplayName "SyncSign User"
Make sure YOUR_DOMAIN_NAME.com is the domain of your organization. The shell will prompt you to enter a password for the new user.
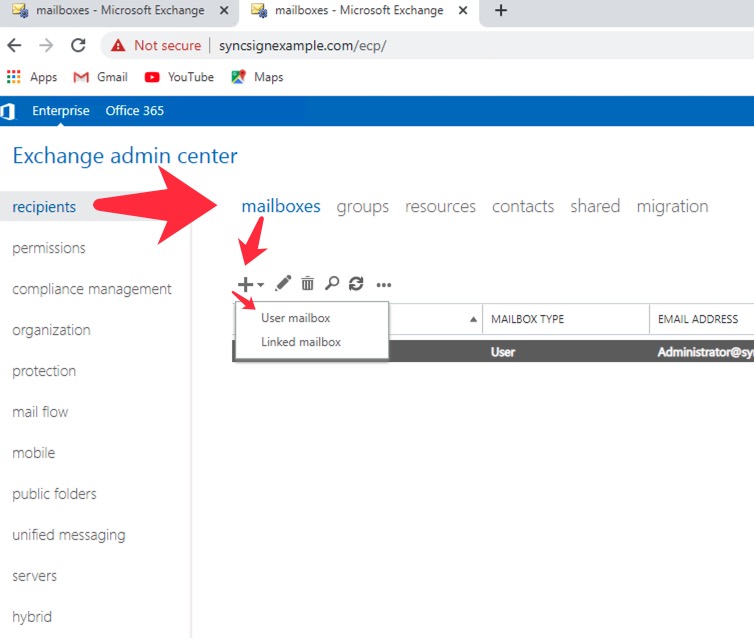
Creating a service account via Exchange console
The following screenshots show Exchange 2016, but the process is the same in Exchange 2007, 2010 and 2013.
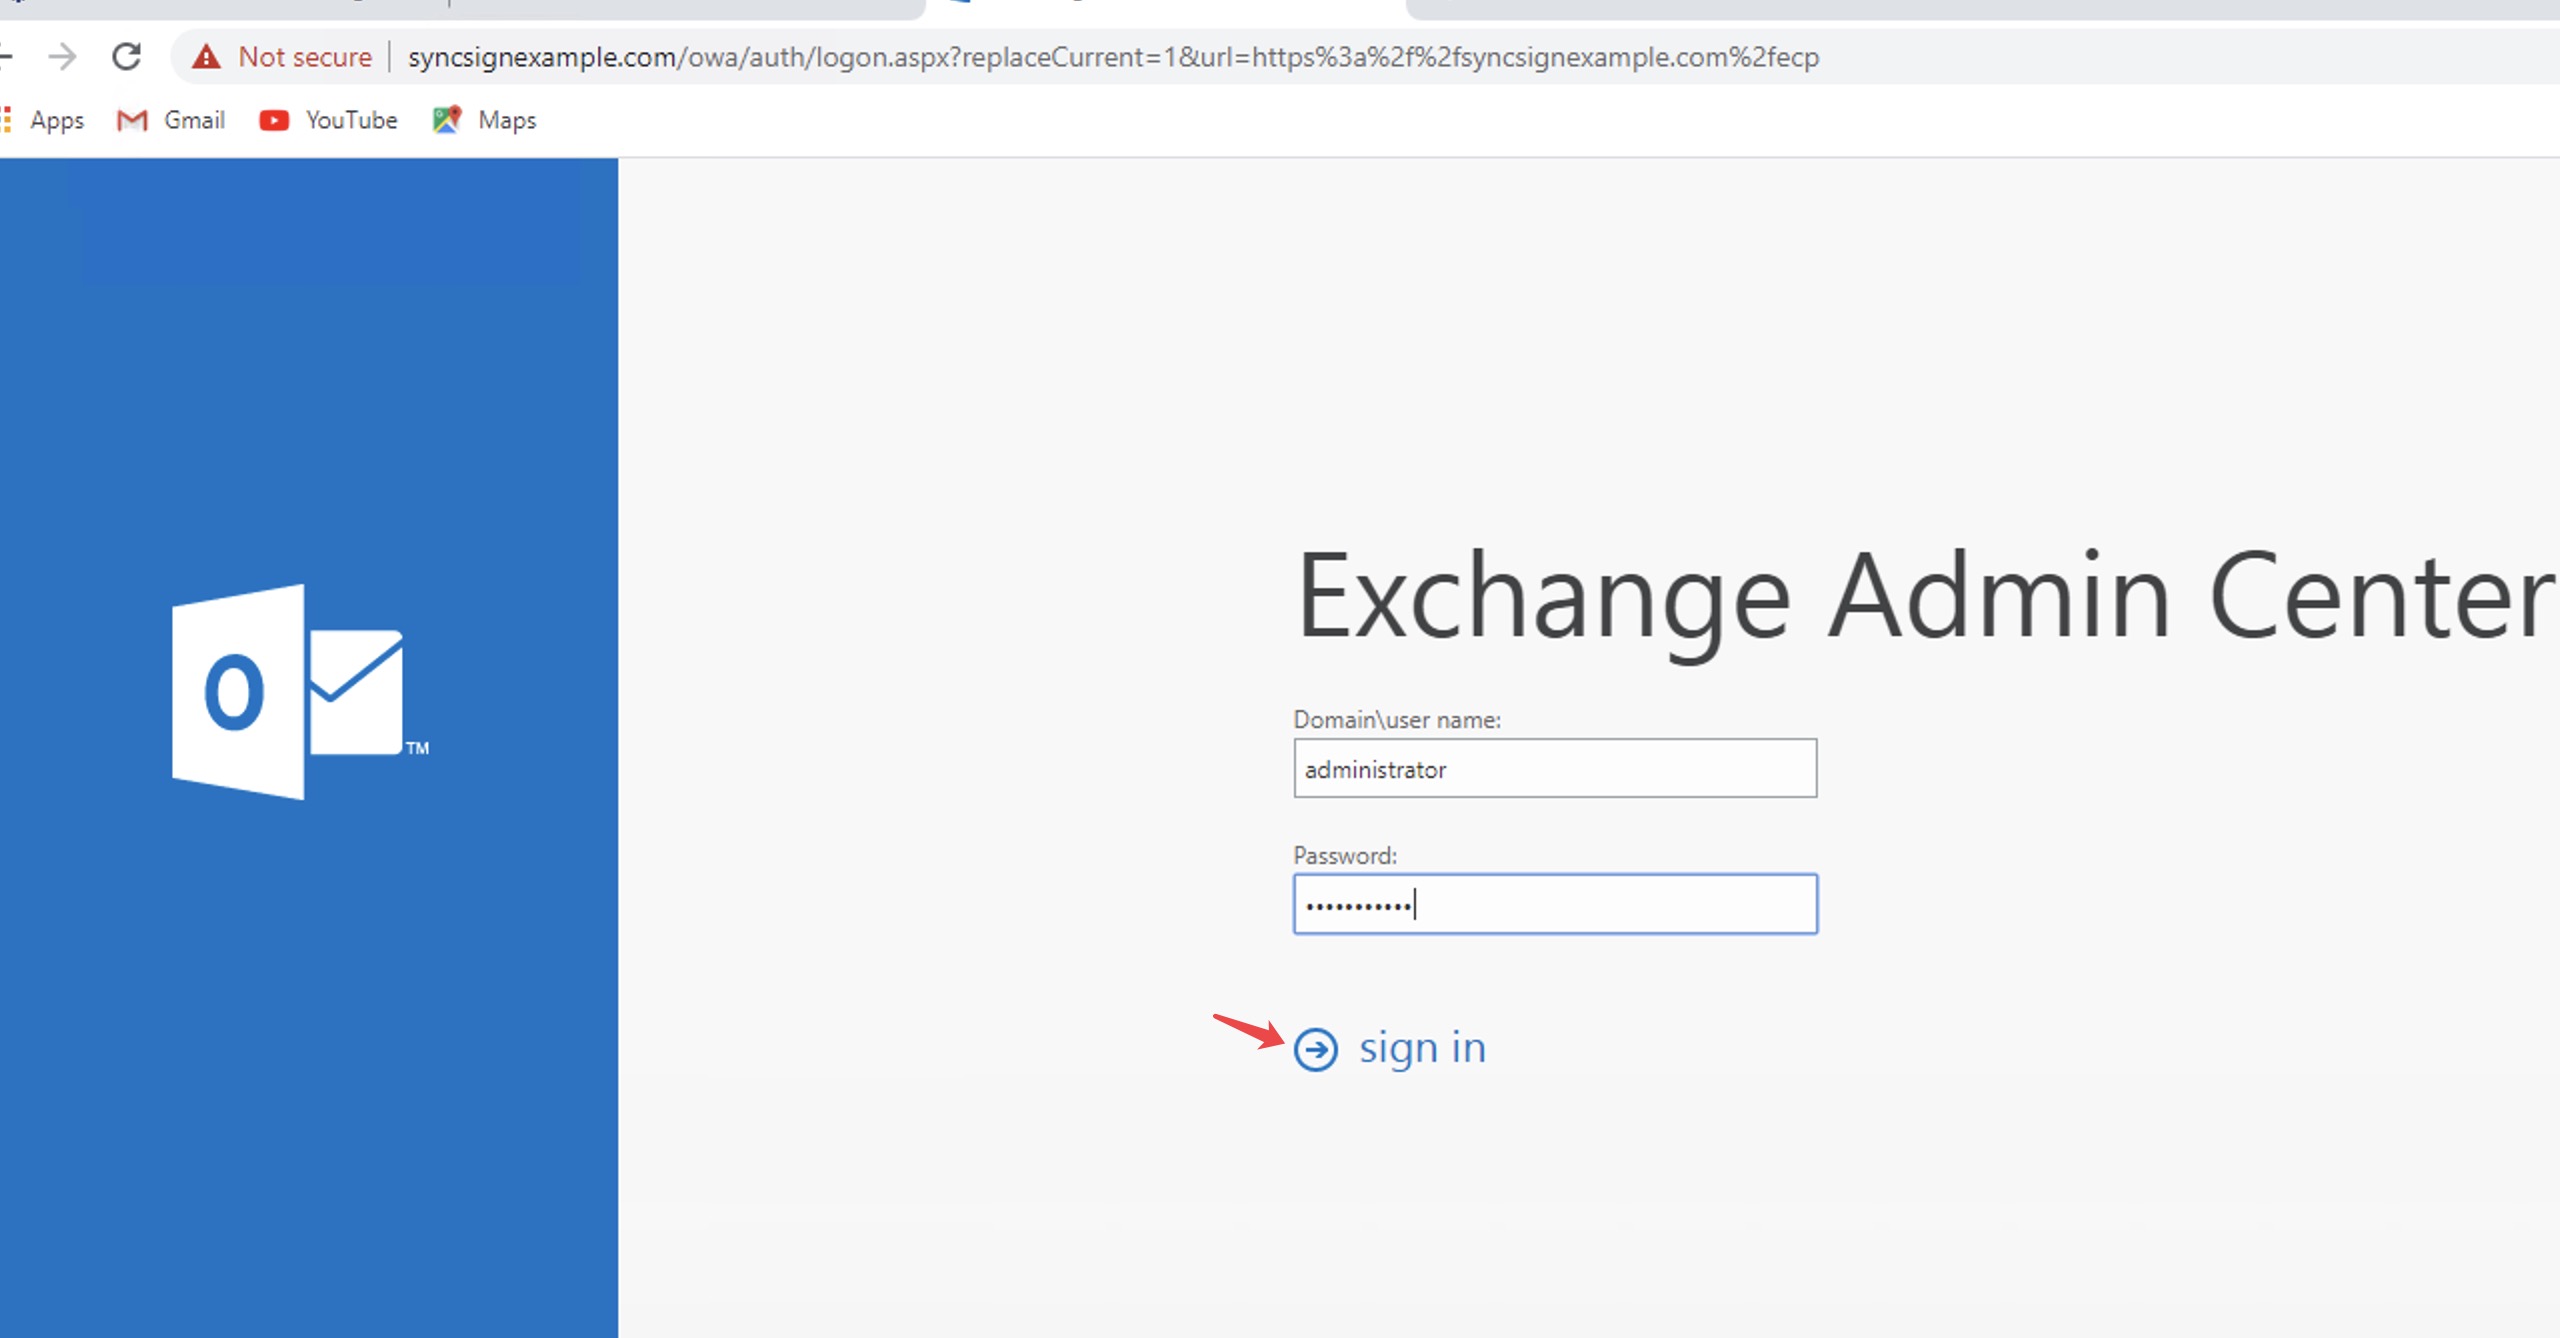
Go to
https://YOUR_DOMAIN_NAME.com/ecp. Sign in Exchange Management Console (EMC) using the Administrator credentials.
Navigate to Recipient Configuration > Mailbox
On the right
Actionspane, clickNew MailboxSelect
User Mailbox/New User
Enter the information to create the account and set up the service mailbox
Enter an alias for the mailbox. This can be something like “booking”, “syncsign”, etc.
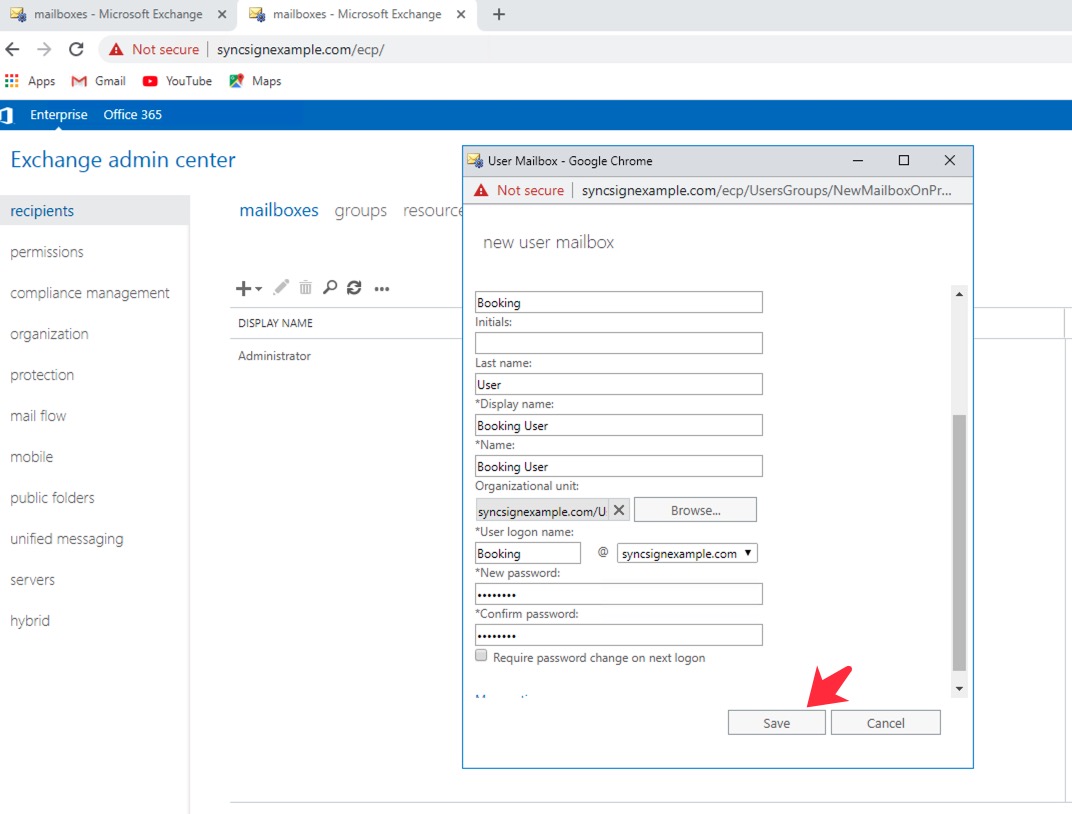
Finish the setup and the user should be created.
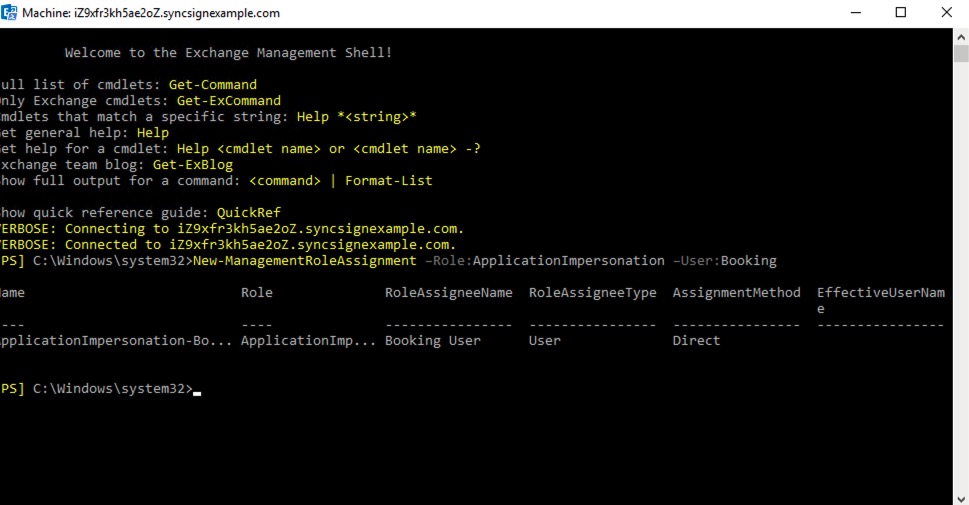
Configure roles for service account
The service account will have access to all calendars, regardless of type.
In the Exchange management shell, run the command:
New-ManagementRoleAssignment –Role:ApplicationImpersonation –User:YOUR_SERVICE_ACCOUNT_USERNAME_HERE
Replace the YOUR_SERVICE_ACCOUNT_USERNAME_HERE with the username created just now.
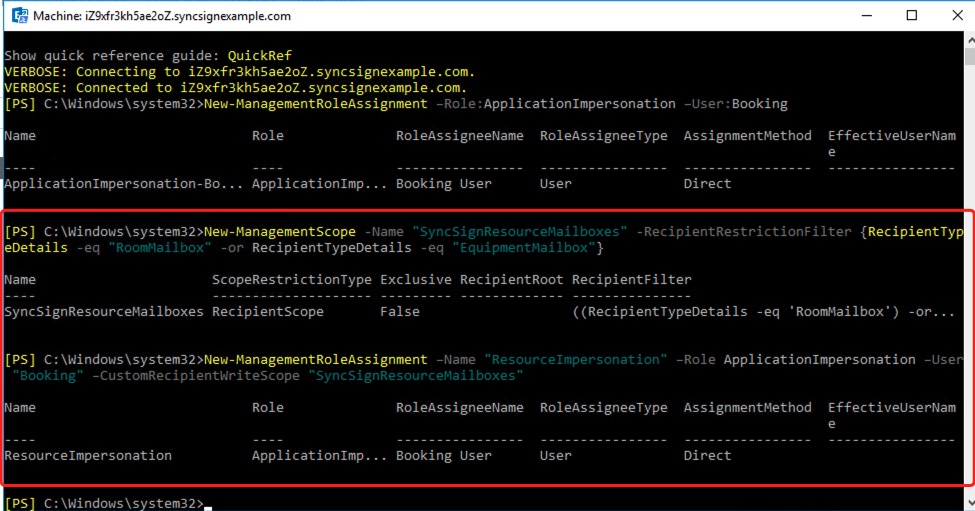
Limit the management scope, then the service account has access to room and equipment calendars only. In the Exchange management shell, run the command:
New-ManagementScope -Name "SyncSignResourceMailboxes" -RecipientRestrictionFilter {RecipientTypeDetails -eq "RoomMailbox" -or RecipientTypeDetails -eq "EquipmentMailbox"}
This creates a new management scope, named SyncSignResourceMailboxes, for only rooms/equipment to act as a filter for the impersonation.
Assign the impersonation to the service account:
New-ManagementRoleAssignment –Name "ResourceImpersonation" –Role ApplicationImpersonation –User "YOUR_SERVICE_ACCOUNT_USERNAME_HERE" –CustomRecipientWriteScope "SyncSignResourceMailboxes"
Connect SyncSign to your Exchange Server
Watch this video link for a walkthrough.
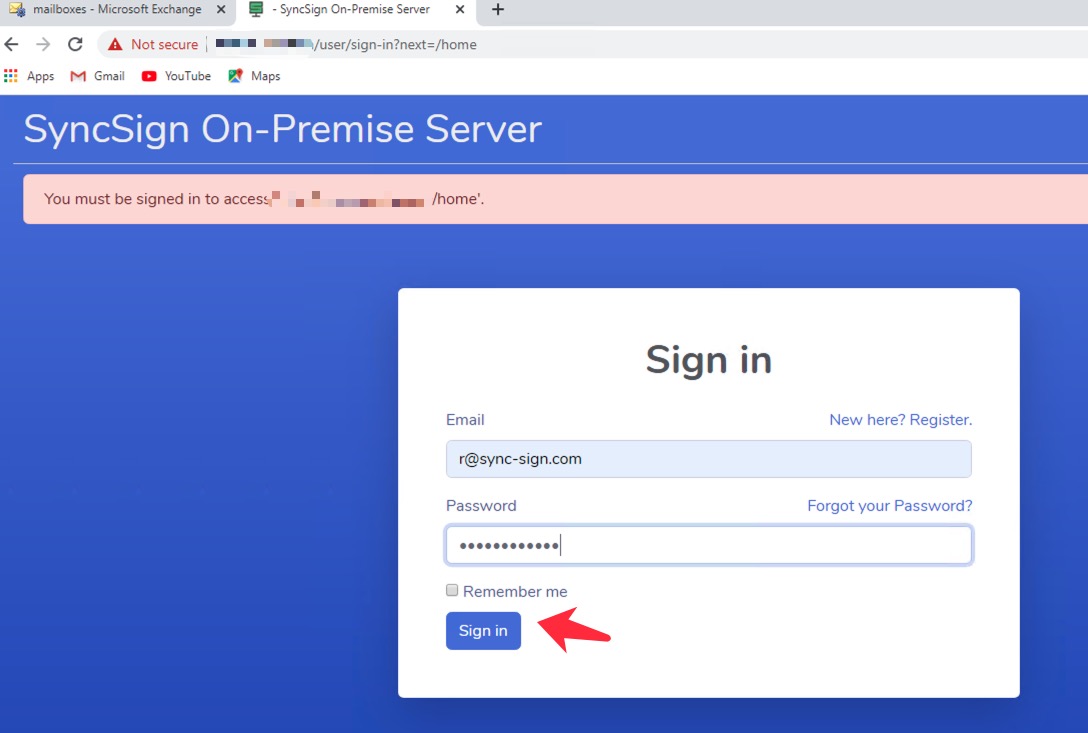
Sign in the portal for SyncSign On-Premise Server(SOPS) with a browser.
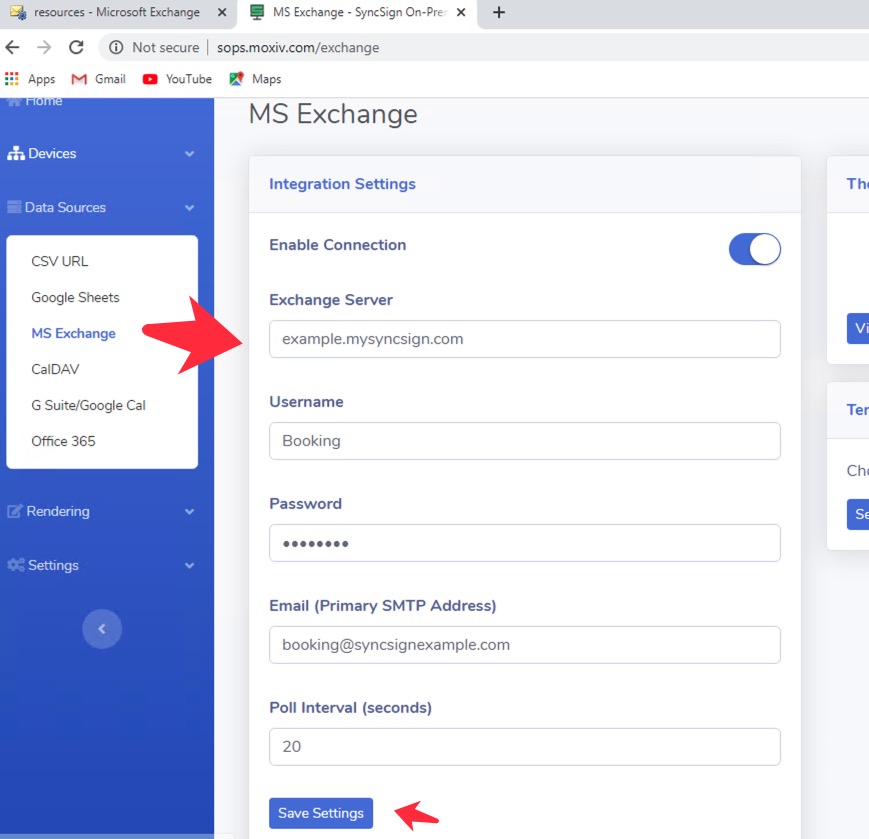
Navigate to the DataSource > MS Exchange
Input the credentials:
Exchange Server: The domain of your Exchange ServerUsername: The user name of the service account you created (SOPS will connect to Exchange Server with this account)Password: The password of the service accountEmail: The email of the service account
Poll Interval: How often the SOPS should access the Exhange Server, e.g. 60 secondsClick
Enable Connectionto enable this integration.
Link the room calendars to SyncSign Displays
Sign in the Exchange Server and create the room resources.
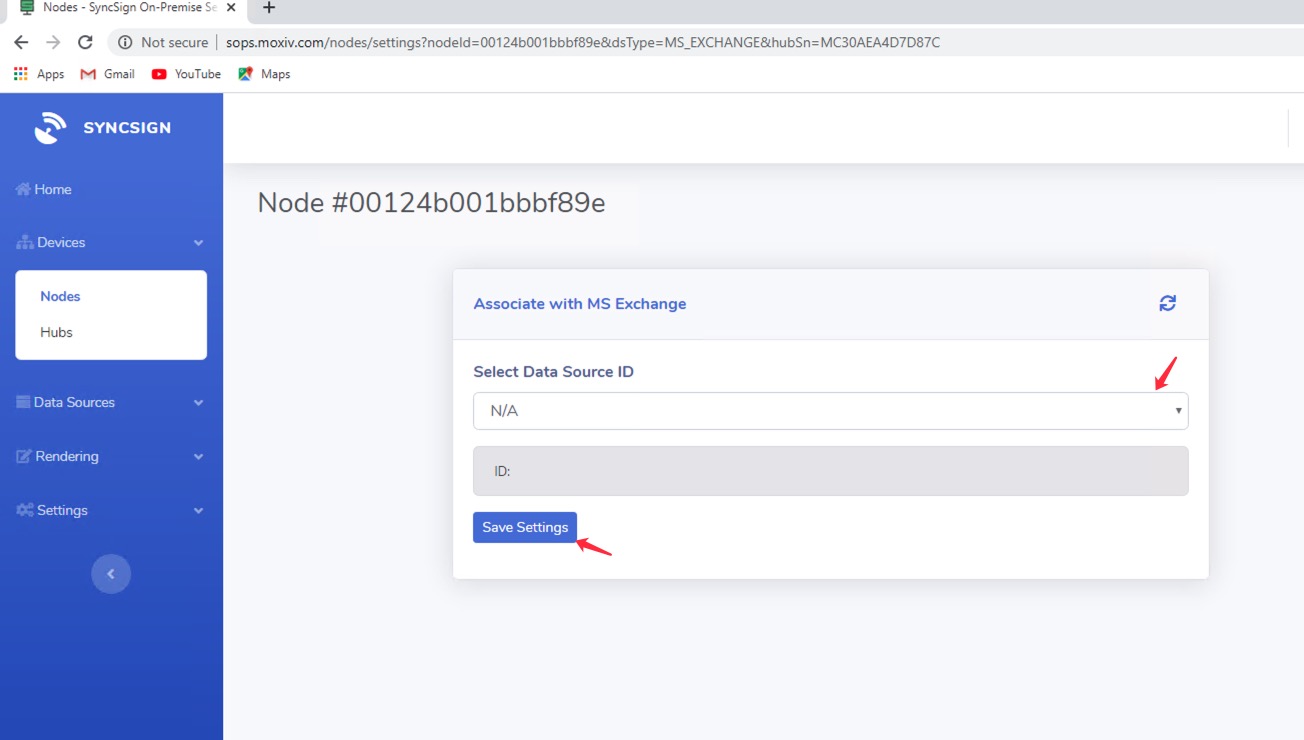
In SOPS Portal, navigate to the
Devices>Nodes, select the Display Node which you are going to link with a room calendar.
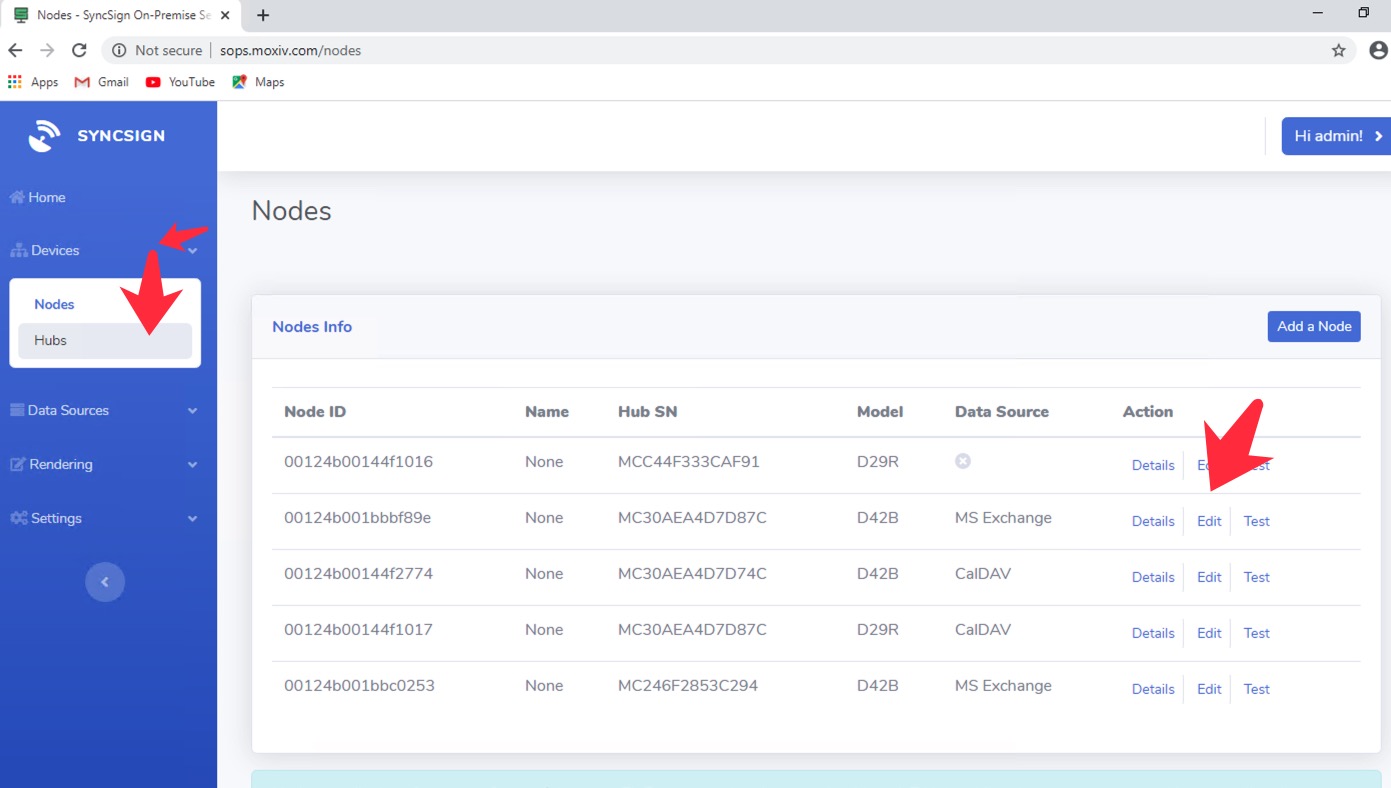
Select the Data Source:
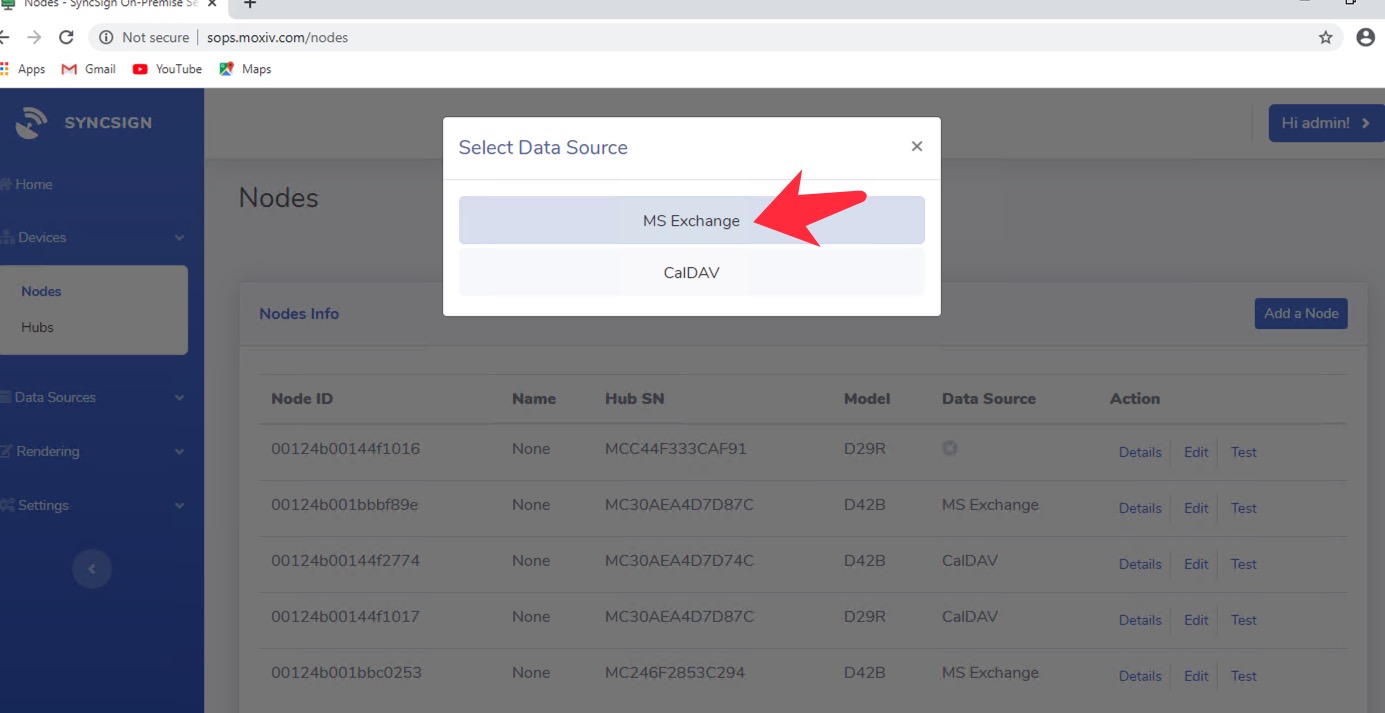
Select the room from the
Room List, andSave Settings(To remove room links, please selectN/A).
Watch this usage video to see how to make a room reservation.
FAQ
How does this work?
SyncSign On-Premise Server (SOPS) will automatically poll the room calendar information at a preset interval.
SOPS will check if there is any changes and send notification to the SyncSign Display to refresh the screen with the new booking information.
There is only the organizer name shown on the SyncSign Display, not the event title.
Make sure the AddOrganizerToSubject property is set to
False(See Add room to room list)
The Events are created/updated on the calendar, the display is not refreshing
Make sure the firewall allows inbound access for SOPS to your Exchange Server by adding the SOPS’s IP address to the whitelist.
Make sure the poll interval is set to a proper value.
How to switch the Exchange Server account?
Switching switching accounts will not delete your events. If will temporally stop the SOPS’s access to the Exchange Server.
To switch the account,
Prepare the new service account (Click here to Create a Service Account)
Make sure the new account can access to the room resources (Click here to Configure roles for service account)
Open
SOPS Portal>Data Sources>MS Exchange(Connect SyncSign to your Exchange Server)Replace the account information and save settings