Run Sample Plug-in
To have a better experience of learning how to get started with the Hub SDK, please try this example.
We have many open-source examples for your reference: https://github.com/myvobot/examples
You may refer to these examples, write your own python code, and run it on the SyncSign Hub Prerequisites
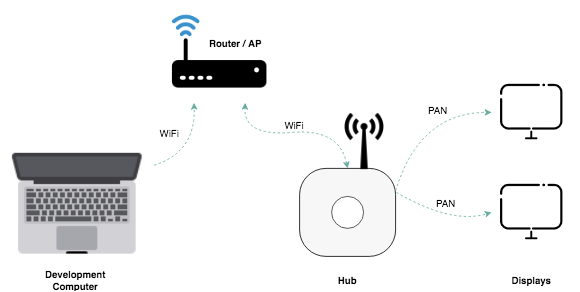
Before start, the Hub and Display must be set up and ready to use.
Download the SyncSign App, create an account and sign-in
Follow the instruction in the App and connect the Hub to Ethernet or Wi-Fi network
Pair at least one Display to Hub
If you see the [ Joined PAN ID: XXXX ] sign appears on Display, it means the Display is managed by Hub.
Enable the Develop Mode
Hub runs the default application and works as a schedule display controller. To run your own plug-in, your Hub must switch to develop mode first.
Open SyncSign App
You should find your Hub online, if not, please check the network, or re-do the Wi-Fi setup procedure
Go to [ Settings ] and find the local IP address of the Hub (for example 192.168.1.15)
Open the Hub admin webpage (http://192.168.1.15) with a web browser on a PC
You are required to sign-in with a user name and password (read the User Manual or contact the tech support)
Click the [ Home ] > [ Developers ] > [ Options ], then Enable the [ Develop Mode ]
Obtain the Sample Plug-in Code
Please clone or download all examples from this repository.
As the beginning, we try the “hello_world”.
Deploy the Sample Plug-in to Hub
Your computer and Hub should be under the same local network.
Open the Hub admin webpage (http://192.168.1.15) with a web browser on a PC
Click the [ Home ] > [ Developers ] > [ Editor ]
Then, upload the sample code on to the Hub:
Copy the content of “examples/hello_world/app/__init__.py” and paste into the code area
Click [ Save ]
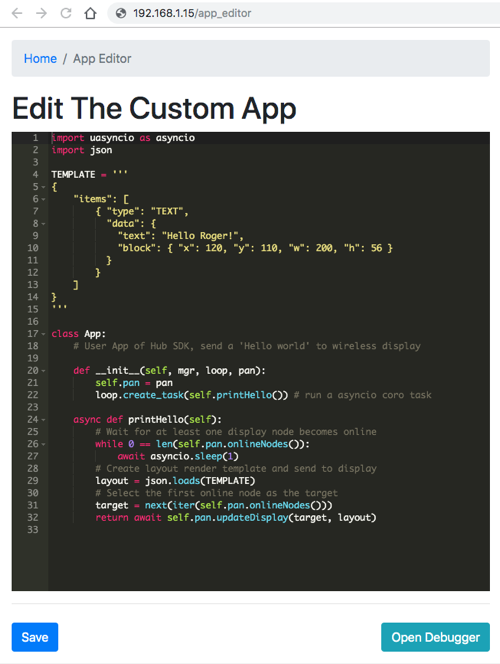
This sample contains only one file. Now the simple plug-in application has been deployed to the Hub.
Open Debug Console
To view the console output of your plug-in,
Click the [ Debugger ], or open http://getvobot.com/dev/webrepl.html
Make sure the target is your Hub’s IP address (e.g., ws://192.168.1.15:8266)
Click [ Connect ], if everything goes well, you should see logs on the terminal section
Remember to use the latest Chrome web browser to open WebRepl.
Run the Sample Plug-in
To run this sample, click [ Reboot ].
The Hub then reboots, and your debug console will disconnect from the Hub for about 10 to 30 seconds.
Assume your Hub will always obtain the same IP address from your router/AP, the debug console will connect to Hub after a while. Then you will see logs on the terminal section again.
The Display you paired will automatically connect to the Hub. Then the Hub will send an instruction to it. You will see ‘HELLO WORLD’ appears on the Display.
Next
Now you can modify the sample plug-in application, then save it to Hub, reboot and see what would happen.